
Introduction ABM with Mason
Winter 2017
Psychology 120
Agent-Based Modeling with Mason
So far, we have learned a little bit about the Java programming language. To build an agent-based model in Java requires a LOT of programming and verification that the code written works as intended. A basic principle that we will be following is to use already developed and tested tools for modeling wherever possible. This is why we will be using a programming environment that already provides us with many of the tools we need to build ABMs. There are many simulation environment available and the list is growing. We will be using MASON. There are several reasons for this choice:
(1) The environment is Open Source.
(2) Because MASON is open source, we have access to the source code and the full power of Java, which allows us maximum flexibility to create ABMs that fit our specifications.
(3) MASON is extremely fast and has been optimized to run very fast, which is important for computationally intensive simulations.
There are drawbacks as well. To use MASON efficiently, one has to learn how to program in Java, which does take time and practice.
Building an ABM with MASON
To build an ABM in Mason requires us to learn new ideas in the Java programming language: interface and inheritance. Let’s go over these two ideas and how we use them in MASON to build ABMs.
Interfaces
In ABM, one of the fundamental things we do is to define classes of agents that can do things. We have already done this with our Talker agent. To create powerful and useful agents, we need a simulation environment that can run agents repeatedly without knowing the details of how the agent actually works. There is a problem, however, How is the simulation environment suppose to know what methods to call from the agents we define? That is, suppose we define a class of agent called “Particle” and we also define a method called “move,” how is the Mason simulation environment going to know what methods we have defined? Suppose we define several movement methods: “move1”, “move2”, and “move3”. How could it possibly know what methods we intend to use and their names?
This problem is solved by defining a basic interface for an agent with a method that the simulation environment already knows about. For MASON, this method is “step” and the interface is called “Steppable”. Let’s look at it.
/*
  Copyright 2006 by Sean Luke and George Mason University
  Licensed under the Academic Free License version 3.0
  See the file "LICENSE" for more information
*/

package sim.engine;

/** Something that can be stepped */

public interface Steppable extends java.io.Serializable
    {
    public void step(SimState state);
    }
This interface class is found in MASON under sim.engine. Notice that there is no code to do anything, but the MASON simulation environment knows that any class that uses the interface “Steppable” has a method called “step” and that it has an parameter called “state” of the class “SimsState”, which we will talk about next.
Every agent that we define from now on will use the interface “Steppable”.
Inheritance
Recall from the first lecture on object-oriented programming and Java that one of the virtues of object-oriented programming is the reuse of code. Reusing code is good for at least two reasons. First, we don’t have to solve the problem again and write the code. Second, and perhaps most importantly, we can reuse code that has been tested and verified, so that we know that it works as intended.
We do this by the mechanism of inheritance. This amounts to defining a subclass based on an already defined class. In Java, every class we define is actually a subclass of the class Object, The class structure of Java is illustrated in the figure below.
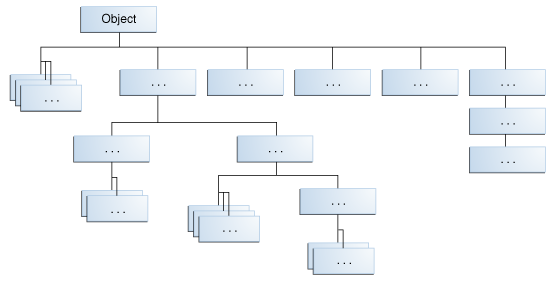
Figure 1 All Classes in the Java Platform are Descendants of Object
In MASON, located in sim.engine is a class called SimState. The class SimState has lots of nice code in it already defined for defining a simulation environment. For example, it has a random object in it that is better than what we have been using and it has a Schedule object for running multiple agents on each step. When we define an Environment class for our agent-based models, we want it to be a subclass of SimState.
Agents
Our first ABM will be quite simple. It will have particle agents that move around in a 2D environment. We will begin by defining a Agent class and defining their Environment as a subclass of SimState. Later, we will define a graphical user interface (GUI), but that can wait.
To make particle agents, we first have to define a class. Let’s call this class Particle. Let’s go ahead and make a new java project and package for our Agent and Envrionment classes. Let’s make it so that it has the following structure:
agents
     agents
          Agent
          Envrionment
Let’s make both of these classes. When we are done, we have two classes that look like this:
package agent;

public class Agent{

}
and
package agents;

public class Environment{

}
We need to use MASON to make further progress, so let’s select the file “menu” and set “properties” so that our project knows where MASON is.
Now, we are going to put the ideas of interface and inheritance to work. First, we will use MASON to run all of the agents we define no matter what they do. The MASON simulation environment knows that all agents have a “step” method so we will make our particle class implement MASON’s Steppable interface. Once we do this, our Agent class will look like this:
package particles;

import sim.engine.*;

public class Agent implements Steppable{

	public void step(SimState state) {
		// TODO Auto-generated method stub

	}
}
To take advantage of MASON’s simulation environment, we will use inheritance to define a subclass that uses SimState plus what we add to it. to do that, we will use the keyword extends to make our Environment a subclass of MASON’s SimState. The result will look like this:
package agents;

import sim.engine.*;

public class Environment extends SimState {

	public Environment(long seed) {
		super(seed); //super uses the constructor
                             //method from the parent
                             //parent class.
               // TODO Auto-generated constructor stub
	}
}
The hard part starts now; we have to fill in the details.
Environment Class Agents
Let’s start by introducing a 2D space that our particles can move in. The space could be continuous or discrete. We will define a discrete space in which agents move to discrete cells. Our space could be represented by a lattice of cells as illustrated below.
As it turns out, MASON has classes for different kinds of spaces, so let’s use one of MASON’s classes for our space in the simulation environment. To add a space variable called space of the class SparseGrid2D, we can write the code as illustrated below:
package agents;

import sim.engine.*;
import sim.field.grid.SparseGrid2D;

public class Environment extends SimState {

	 public SparseGrid2D space;  //This is a 2D space in which
                                             //bags
	                                   //are created for each
         //cell once an
	 //agent or a particle first moves into a cell.
         //This allows multiple
	 //agents or particles to occupy the same cell.

	public Environment(long seed) {
		super(seed);
		// TODO Auto-generated constructor stub
	}
}
Before we can create a 2D space for our particles, we must specify the dimensions of the space. Lets call these variables gridWidth and gridHeight.
package agents;

import sim.engine.*;
import sim.field.grid.SparseGrid2D;

public class Environment extends SimState {

	 public SparseGrid2D particleSpace;
          //This is a 2D space in which bags
          //are created for each cell once an
	 //agent or a particle first moves into a cell.
         //This allows multiple
	 //agents or particles to occupy the same cell.

          public int gridWidth = 50;  //the width of the grid
          public int gridHeight = 50; //the height of the grid

	  public Environment(long seed) {
		super(seed);
		// TODO Auto-generated constructor stub
	}
}
To make the space that we will place agents in, we have to use the start method.
 public void start() {
      super.start(); //use the previously defined code, then we add our own.
}
Notice a new keyword super, which is used to call up the previously defined code when we override what was previously written in the parent class. We will then add our own code after super.start(). Our Environment class now should look something like this:
package agents;

import sim.engine.*;
import sim.field.grid.SparseGrid2D;

public class Environment extends SimState {

	 public SparseGrid2D space;
          //This is a 2D space in which bags
	  //are created for each cell once an
	 //agent or a particle first moves into a cell.  This allows multiple
	 //agents or particles to occupy the same cell.

	 public int gridWidth = 50;  //the width of the grid
         public int gridHeight = 50; //the height of the grid

	 public Environment(long seed) {
		super(seed);
		// TODO Auto-generated constructor stub
	}

	public void start(){
		super.start();
		space = new SparseGrid2D(gridWidth, gridHeight);
                //create a 2D
		//space for our agents.
	}
}
Agents in Space
We have just defined how to create a space, now we need to make our agents and place them somewhere in our newly created space. First, we must specify how many agents we wish to make. Let’s make 100 agents (we could choose any positive integer within reason). We could specify this by writing:
public int n = 100; //The number of agents
Now, all we need to do is create 100 agents and put them into our 2D agentSpace. Where do we put them? We could put them in random locations like this:
package agents;

import sim.engine.*;
import sim.field.grid.SparseGrid2D;

public class Environment extends SimState {

	 public SparseGrid2D space;
          //This is a 2D space in which bags
	  //are created for each cell once an
	 //agent or a particle first moves into a cell.
         //This allows multiple
	 //agents or particles to occupy the same cell.

	 public int gridWidth = 50;  //the width of the grid
         public int gridHeight = 50; //the height of the grid
         public int n = 100; //The number of particles

	 public Environment(long seed) {
		super(seed);
		// TODO Auto-generated constructor stub
	 }

	 public void start(){
		super.start();

		space = new SparseGrid2D(gridWidth, gridHeight);
                //create a 2D
		//space for our agents.

		/*
		 * Now, let's make n particles and put them into random
                 *locations in particleSpace
                 * To do this, we will use the random method built
                 * into SimState.
                 * It has lot's of
                * methods, which make generating random locations easier.
                */

               for(int i=0;i < n;i++){
                    Agent p = new Agent(this);
                    space.setObjectLocation(p, p.x, p.y);
               }
         }
}
Graphical User Interface (GUI)
We have placed the particles randomly into a 2D space, but we can’t see them. To see them, we need to create a graphical user interface (GUI). To do this, we are going to use classes defined in MASON. The trouble is that there are a lot of classes and you have to know the theory behind MASON’s GUI classes to write this class from scratch, so I’m going to just give you a basic GUI class, tell you what each component means, and then move on to try it out. As we continue to develop our skills at ABM, we will tweak this basic file so that we can change our GUIs as we see fit. Here is the basic GUI class we will use:
package agents;

import sim.engine.*;
import sim.display.*;
import sim.portrayal.grid.*;
import java.awt.*;
import javax.swing.*;
import sim.portrayal.simple.OvalPortrayal2D;

public class AgentsWithUI extends GUIState {
	public Display2D display;
	public JFrame displayFrame;
	SparseGridPortrayal2D agentsPortrayal =
                             new SparseGridPortrayal2D();

	public static void main(String[] args) {
		AgentsWithUI ex = new AgentsWithUI();
		Console c = new Console(ex);
		c.setVisible(true);
		System.out.println("Start Simulation");
	}

	public AgentsWithUI() {
		super(new Environment(System.currentTimeMillis()));
	}

	public void quit() {
		super.quit();

		if (displayFrame!=null) displayFrame.dispose();
		displayFrame = null;
		display = null;
	}

	public void start() {
		super.start();
		setupPortrayals();
	}

	public void load(SimState state) {
		super.load(state);
		setupPortrayals();
	}

	public void setupPortrayals() {
                Environment se = (Environment)state;
		agentsPortrayal.setField(se.particleSpace);
                OvalPortrayal2D o = new OvalPortrayal2D(Color.red);
		agentsPortrayal.setPortrayalForAll(o);
		display.reset();
		display.repaint();
	}

	public void init(Controller c){
		super.init(c);
		display = new Display2D(400,400,this);
		displayFrame = display.createFrame();
		c.registerFrame(displayFrame);
		displayFrame.setVisible(true);
		display.setBackdrop(Color.black);
		display.attach(agentsPortrayal,"Agents");
	}

	public Object getSimulationInspectedObject() {
		return state;
	}
}
How to Make the Particles do Something
In the next lecture, we will give the particles rules for movement and schedule them to run in the simulation environment.